[How To] Setup webcam for recording or video conference applications
Answer
This article applies to all MSI laptop products.
Applicable Scenario
When you need to use your laptop's built-in camera for recording, live streaming, or video conferencing (such as Zoom, Teams, Google Meet, etc.), if you find that the camera cannot be turned on properly or the software cannot read the camera feed, please follow the setup steps below to apply the relevant camera settings.
Steps
1.If your laptop is equipped with a physical "Webcam Lock Switch," please switch it to the unlocked position before using the camera. For the exact location of this switch, please refer to the user manual for your specific model on the MSI official website to confirm whether your laptop is equipped with this feature.
2.Use the shortcut key Fn + F6 to turn on the camera (the actual shortcut key may vary depending on the model; please refer to the actual labeling on your laptop).
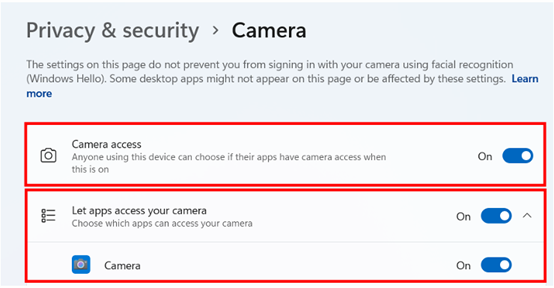
3.Go to Windows Settings > Privacy & Security > Camera, turn on "Camera access," and allow the applications you need to use to access the camera.
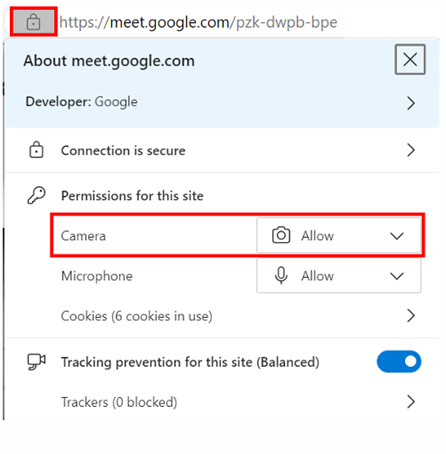
4.If you need to use video conferencing through a browser (such as the web version of Google Meet or the web version of Teams), please make sure that the browser settings for that website allow camera access.
5.If you are using a separately installed video conferencing application (such as the Zoom client or Teams client), please also make sure that the camera switch within the application's internal settings is turned on.
Note: If the camera is currently being used by one application, other applications will not be able to access it at the same time. If you want to use the camera in a different application, please close the application currently using the camera before trying again.