[Motherboard] How to upgrade or install a CPU on the motherboard?
Please follow the steps below to upgrade or install a CPU on your motherboard:
Check CPU compatibility
Before installing or replacing the CPU, please make sure to verify which CPU models are supported by your motherboard.
1. Visit the MSI official website and click on the magnifying glass icon located in the top right corner, for example: MPG Z790 CARBON WIFI. Choose the search icon in the top right corner and enter "MPG Z790 CARBON WIFI" in the search field. Press the "Enter" key to initiate the search.

2. On the product page, click on "Support" → "Compatibility" → "CPU Support" to view all the CPU models that have been tested and certified by MSI for compatibility with your motherboard.

Note: Certain CPU models may only support specific versions or updated BIOS. When checking the compatibility between the CPU and the motherboard, it is also important to consider the compatibility between the CPU and the BIOS.
Install the CPU to the motherboard
After confirming that both the motherboard and BIOS support the CPU you are about to install, please follow the steps below to install your CPU.
Note:
- The installation process may vary slightly for CPUs with different platforms or socket types. Please refer to the motherboard's user manual before proceeding.
- Before starting, make sure the computer is powered off and the power source is disconnected.
- During the installation, please lay the motherboard or computer case flat to prevent incorrect installation.
- If you encounter any issues during the installation process, please contact the MSI customer service center to avoid damaging the CPU or motherboard.
The following content takes the Intel LGA1700 pin and AMD AM5 pin as examples respectively:
- Intel LGA1700:
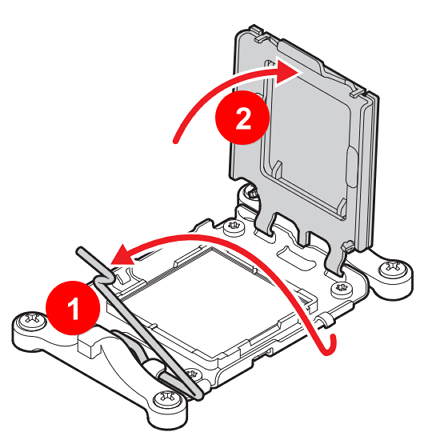
1. Pull the CPU socket lever outward and lift it up. Lift the protective cover of the CPU socket.
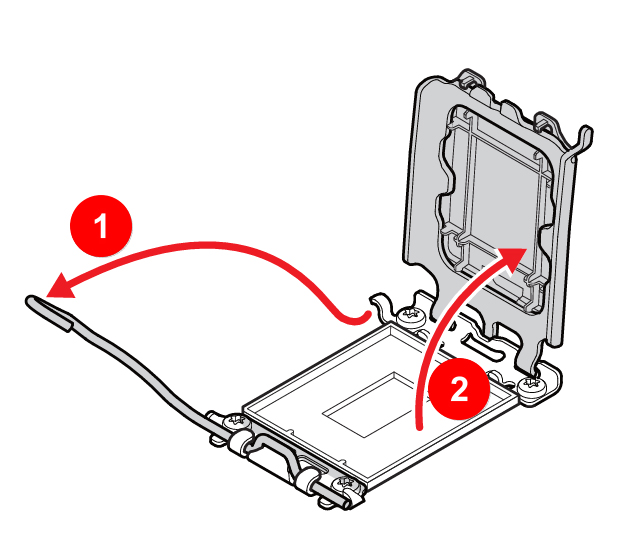
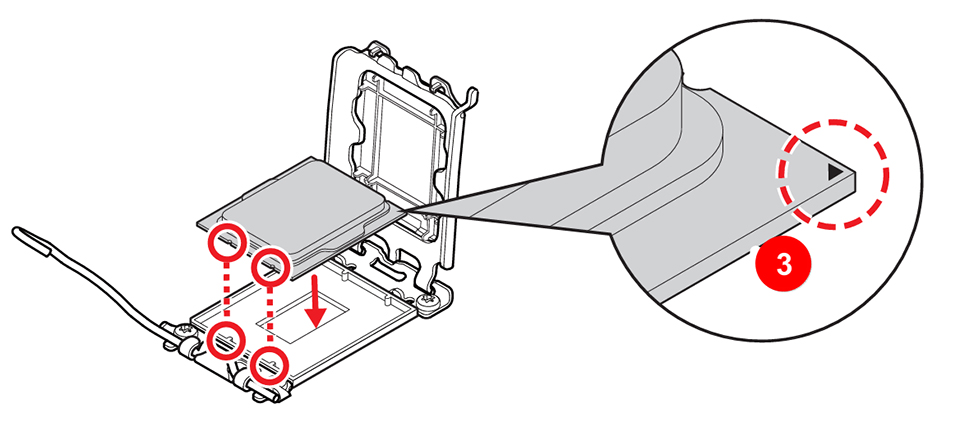
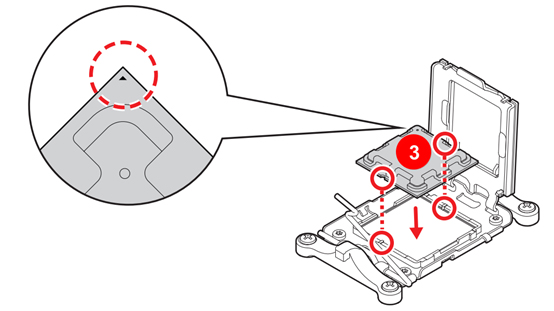
2. Align the triangle marking on the CPU with the triangle marking on the CPU socket. Match the notches on the CPU with the protrusions on the CPU socket and gently place the CPU vertically downwards.
Note : Both the socket and CPU are designed to prevent incorrect installation. If any sides of the CPU appear to be tilted after installation, it indicates an incorrect installation. Please reinstall the CPU correctly.
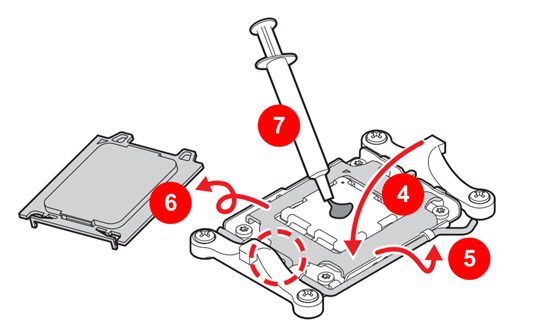
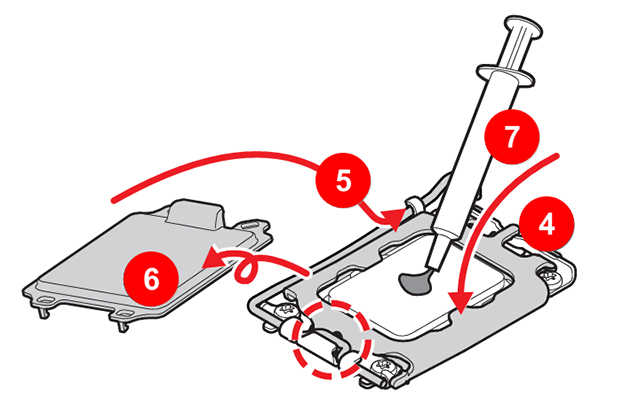
3. Close the CPU protective cover and lock the socket lever. The CPU protective cover will automatically pop out. Apply the thermal paste onto the CPU, and the installation process is complete.
- AMD AM5:
1. Pull the CPU socket lever outward and lift it up. Lift the protective cover of the CPU socket.
2. Align the triangle marking on the CPU with the triangle marking on the CPU socket. Match the notches on the CPU with the protrusions on the CPU socket and gently place the CPU vertically downwards.
Note : Both the socket and CPU are designed to prevent incorrect installation. If any sides of the CPU appear to be tilted after installation, it indicates an incorrect installation. Please reinstall the CPU correctly.
3. Close the CPU protective cover and lock the socket lever. The CPU protective cover will automatically pop out. Apply the thermal paste onto the CPU, and the installation process is complete.
