


[Graphics Card] How to Use MSI Afterburner
Using the widely-used and free MSI overclocking software, MSI Afterburner, can significantly boost your graphics card's performance. By adjusting and monitoring its features, you can enhance your gaming experience. However, please make sure and be aware that MSI Afterburner is only recommended to be downloaded from msi.com or guru3d.com to avoid installation programs from phishing websites that may modify the program or disguise themselves to steal your valuable data. To ensure you have the correct version, always download MSI Afterburner from the official MSI website or Guru3D.
MSI Afterburner offers users numerous additional features, including one-click overclocking, OSD/screen data display, and customizable fan settings. This article will delve into these aspects as an introduction and tutorial.
- Preceding Operation
- Page Introduction
- OC SCANNER User Guide
- Displaying Hardware Monitoring Data in Games
- Custom Fan Speed
Preceding Operation
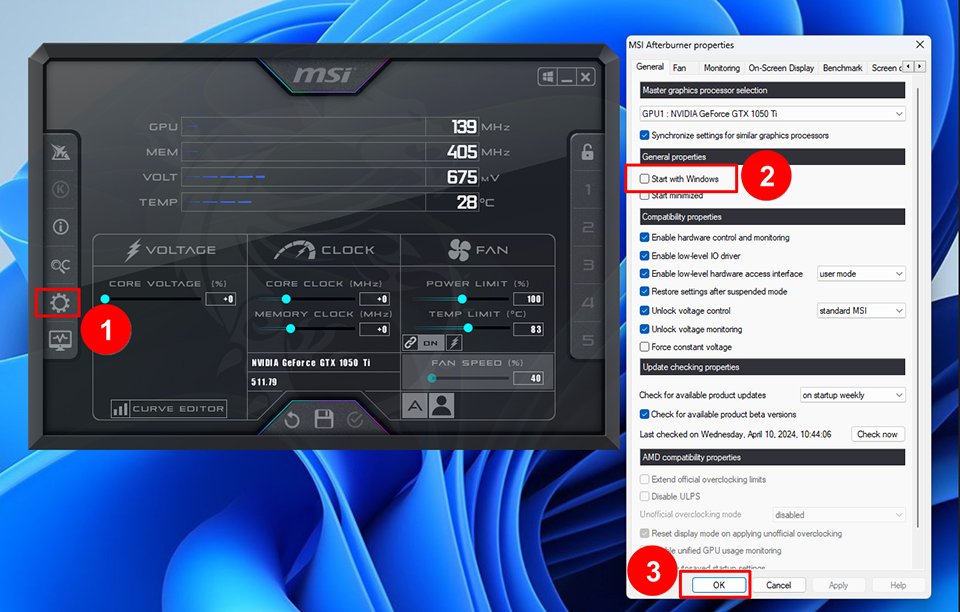
Please ensure that you've installed the latest GPU drivers and the most recent version of MSI Afterburner before proceeding. If you encounter installation issues because MSI Afterburner is already running, please disable the "Start with Windows" option in the "Settings" menu, then click "OK" to save the changes. Restart your computer and continue with the installation.
After installing MSI Afterburner, navigate to the "Settings" menu and enable the "Start with Windows" option. This will allow MSI Afterburner to automatically load your settings and GPU fan settings upon computer startup.
If you have recently installed a new graphics card and MSI Afterburner fails to recognize it, please install the graphics card drivers and then restart your computer. MSI Afterburner will then recognize the new graphics card.
Page Introduction
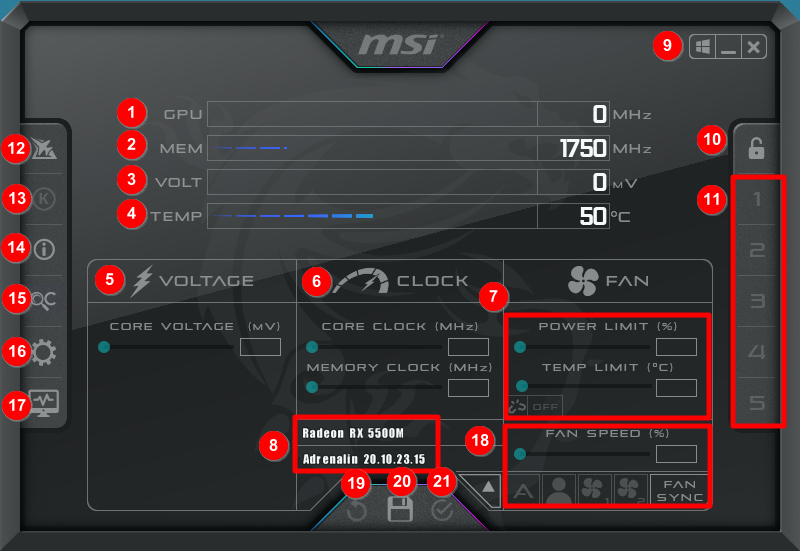
- GPU frequency.
- VRAM frequency.
- GPU core voltage.
- GPU core temperature.
- Adjusting GPU core voltage.
- Adjusting GPU core and VRAM frequencies.
- Adjusting graphics card power and temperature limits.
- GPU name, driver version.
- Applying MSI Afterburner profile on Windows startup, minimizing, or closing MSI Afterburner.
- Locking personalized settings.
- Personalized settings profiles.
- MSI Afterburner official page.
- MSI Kombustor.
- Viewing graphics card-related information.
- OC Scanner for one-click overclocking.
- MSI Afterburner settings.
- Separating hardware monitoring window.
- Adjusting fan speed, choosing automatic or user-defined fan settings, selecting fan configuration, fan speed synchronization.
- Restoring settings to default.
- Saving current settings.
- Applying current settings.
OC SCANNER User Guide
Before you begin, it's crucial to emphasize that GPUs come with built-in protections that reduce frequency or voltage when they reach their limits. While overclocking is generally safe, any damage caused during this process is not covered by warranty, so exercise caution.
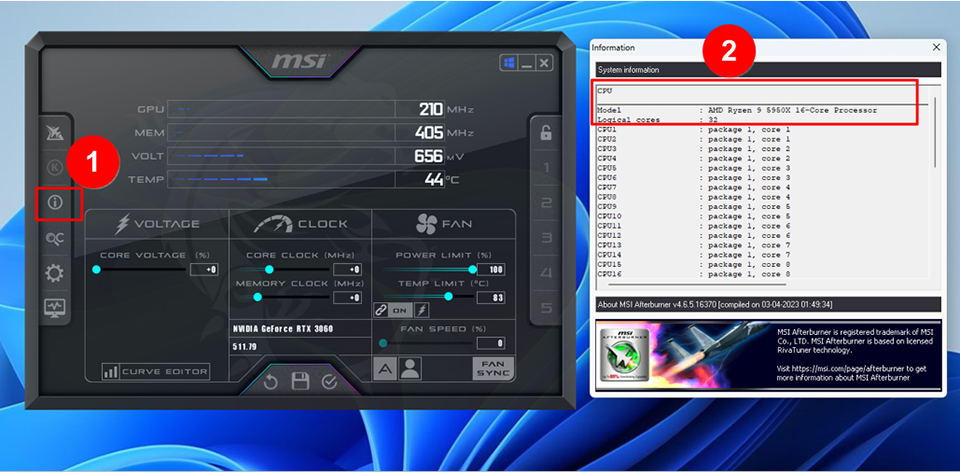
Before overclocking, save all your work and close any other applications, as this process may take around 30 minutes or less. MSI Afterburner is compatible with nearly all GPUs, including non-MSI graphics cards. In the information window, you can view the MSI Afterburner version, and all installed and integrated GPUs will be listed here.
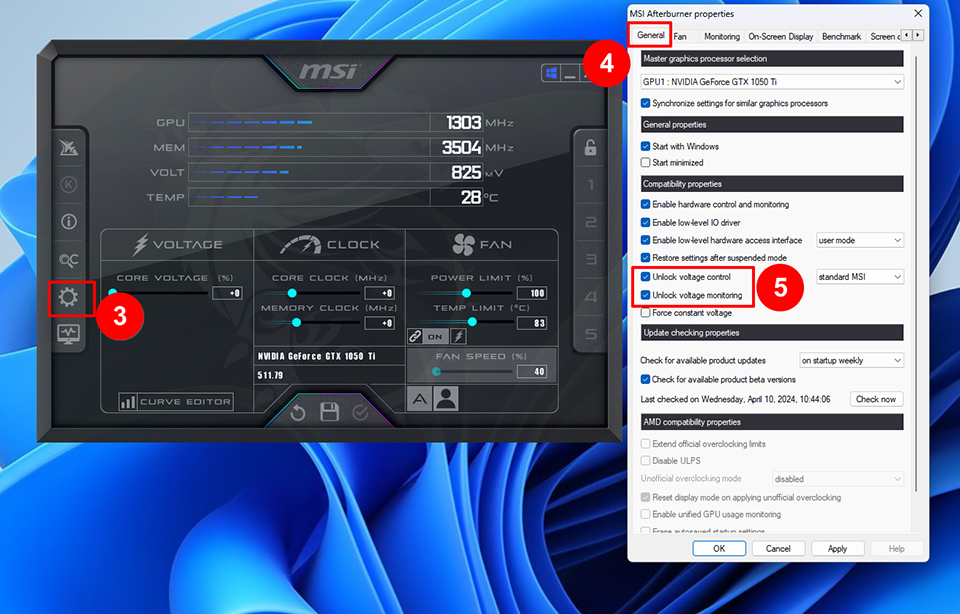
Ensure that you have enabled "Unlock voltage control" and "Unlock voltage monitoring" in "Settings/General" before running the benchmark test to obtain baseline GPU performance. Take note of the test results and compare them in MSI Afterburner, focusing on GPU frequency, memory frequency, voltage, and temperature as the main metrics. MSI Afterburner also works with laptop GPUs, but it's recommended to apply minor boosts and closely monitor CPU and GPU temperatures.
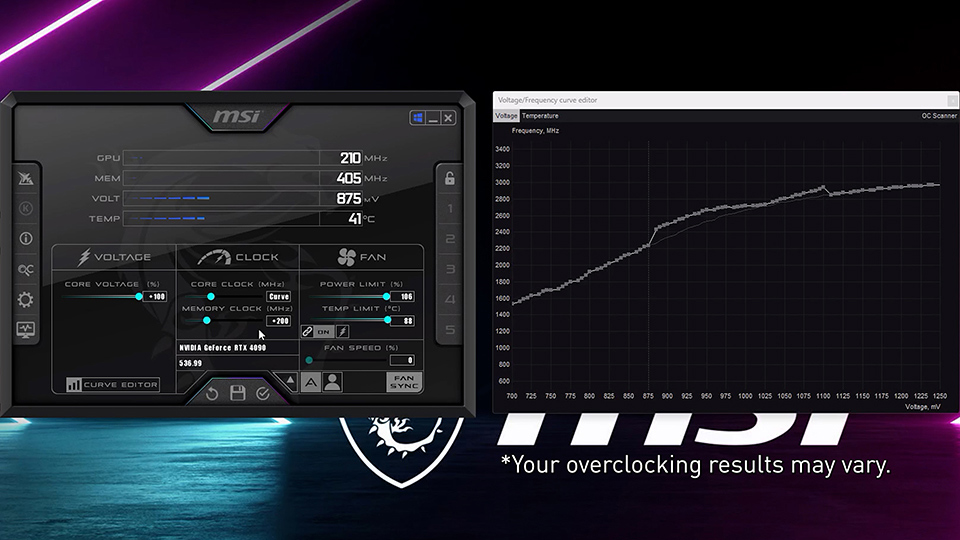
Slide the power and temperature limit sliders, as well as the core voltage, to the right to their maximum values, then click "Apply" and "OK" to save. Click "Curve Editor" or the magnifying glass icon with "OC" on the main window.
Click "Scan" to start one-click overclocking, which takes about 30 minutes to complete. Once finished in the main window, the core frequency value will display as a curve, while the memory frequency may default to a conservative 200 MHz; please adjust it after achieving your desired curve.

Since custom curves take half an hour to create, save the new curve to several profiles by clicking the save icon, then click "Profile Number" to complete the save. Click the "Apply" button at the bottom center to apply the overclock. In the main window, pressing numbers 1 to 5 will load saved profiles, and Ctrl+1 to Ctrl+5 will delete them, so please proceed with caution. To revert the GPU to default settings during testing, simply click "Reset" (circular arrow icon) or use Ctrl+D for automatic application, ensuring your saved profiles remain intact.
Use benchmark testing software like Unigine Heaven or FurMark to check overclock stability. Let the benchmark run for 10 minutes while monitoring for anomalies such as flickering, crashes, or shutdowns. If issues arise, consider adjusting the curve, saving changes, and retesting. Once you're ready, launch your favorite game for testing purposes.
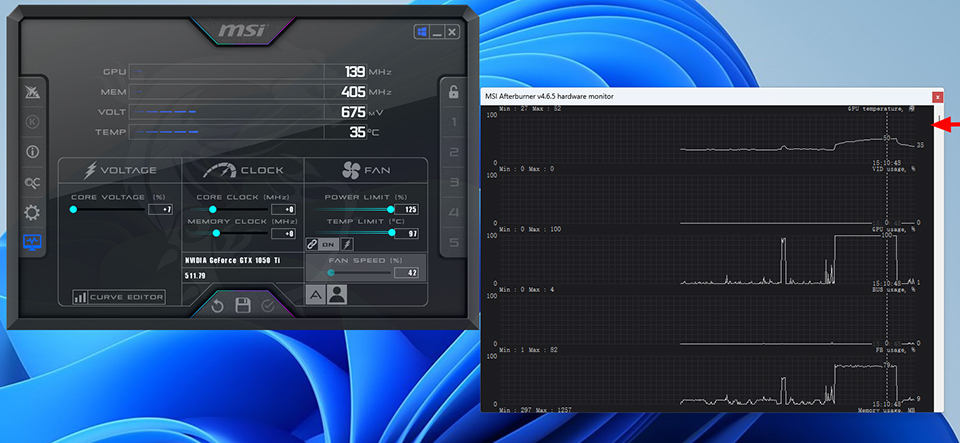
Displaying Hardware Monitoring Data in Games
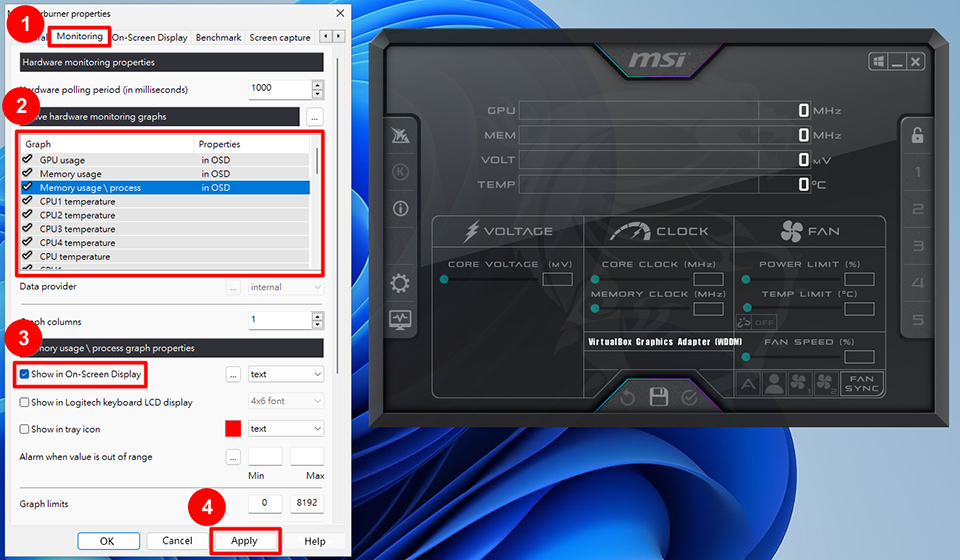
MSI Afterburner can show all GPU and CPU statistics while gaming. Let's get started with the setup. First, choose the data you want to see and display it on the OSD.
Click "Settings," then head to the "Monitoring" tab. In the graph section, select the monitoring values you prefer and then click "Show in On-Screen Display". Once you've chosen all the desired values, click "Apply."
Note: To display hardware monitoring data, you need to have "RivaTuner Statistics Server" installed. During MSI Afterburner's installation, it will ask if you want to install it too. If you only installed MSI Afterburner initially, please download RivaTuner Statistics Server separately from the Guru3D website and install it.
If you wish to adjust data font color, position, size, or other settings, open RivaTuner Statistics Server for relevant options.
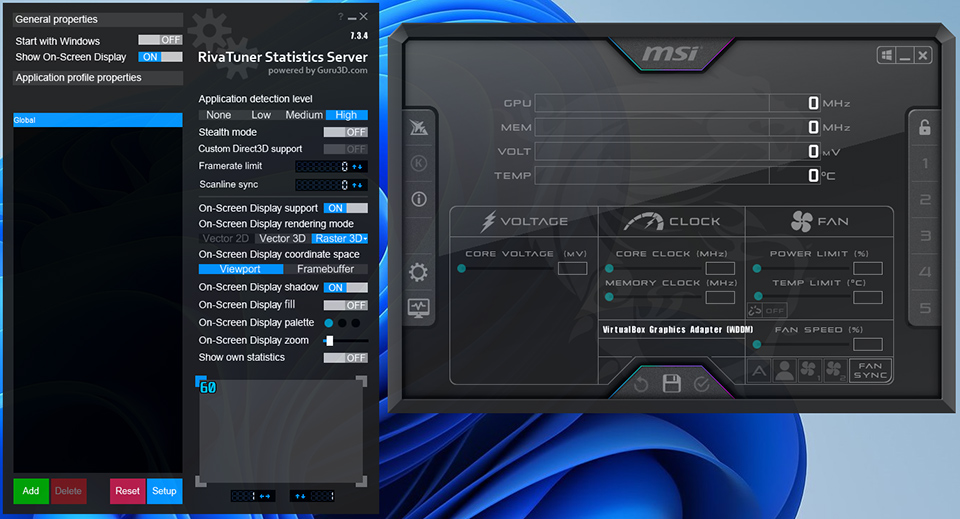
Your setup is now complete. Please keep in mind that both MSI Afterburner and RivaTuner Statistics Server must run in the background for you to view monitoring data in games. You can set both programs to "Start with Windows" to avoid opening them manually every time you boot up your computer.

Custom Fan Speed
Navigate to "Settings," then select the "Fan" option at the top, followed by "Enable user-defined software automatic fan control."
Adjust your graphics card's fan speed by dragging the nodes in the fan curve. After making adjustments, click "Apply."
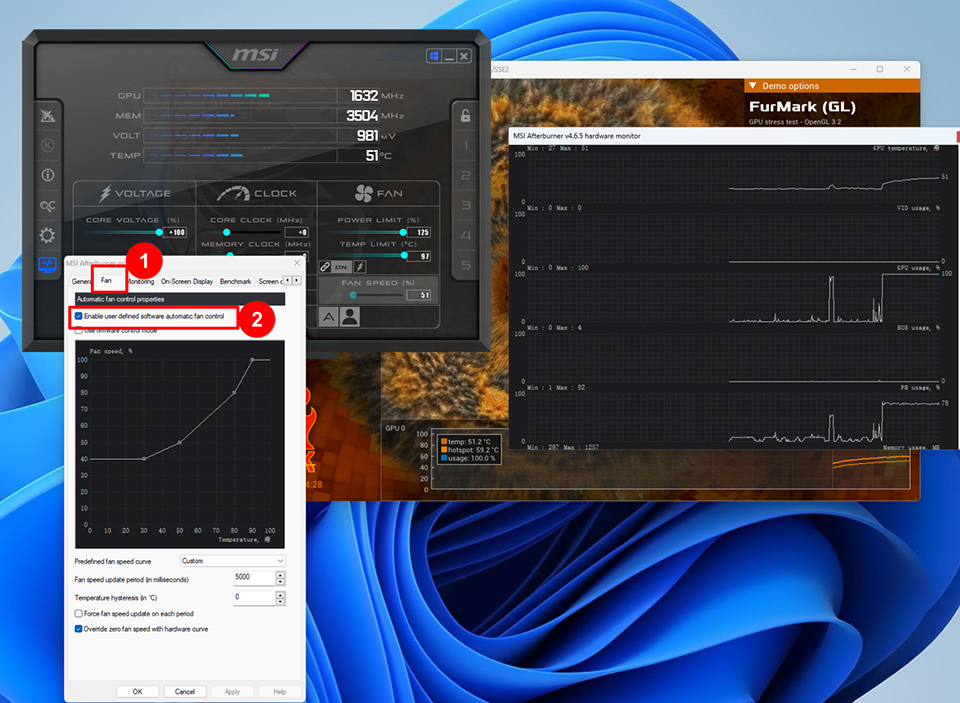
Note: Laptops' GPUs cannot utilize custom fan curves since they are preset by the manufacturer in the BIOS.
The above overview covers MSI Afterburner's common features. For details on other features and operations, please refer to:
MSI Afterburner Walkthrough Part 1: Overclocking Guide & Undervolting Guide
MSI Afterburner Walkthrough Part 2: On Screen Display, Monitoring and Features
If you have further questions regarding the above information, please contact MSI's customer service center.
Reference Information and Related Articles
MSI Afterburner Walkthrough Part 1: Overclocking Guide & Undervolting Guide
MSI Afterburner Walkthrough Part 2: On Screen Display, Monitoring and Features